
Supplies:
Happy Thoughts Stamp Set
Echo Park Party Time Cardstock, cut 8" x 11"
Memento Dew Drop Ink in Love Letter, Morocco, Northern Pine
EK Tools Hydrangea Confetti Punch
1. Grab the precut cardstock and on the 11 inch side, using the bone folder, score at 1 3/4 inches and 9 1/4 inches. Rotate paper and on the 8 inch side score at 1 3/4, 3 1/2, 5 1/4, and 7 inches. Fold and burnish all score lines.

2. With the thinnest rectangles facing you, cut off both end rectangles and slightly wedge the middle longest rectangle.

3. Now you will have 4 squares on each end. Cut and remove the first square on both sides, then cut up each score line releasing the squares. On the 2nd and 4th square, create tabs by cutting a small wedge on each side of those two squares, leaving the 3rd square intact as shown.

4. Add adhesive of choice, I'm using Art Glitter Glue on the the tabs as the picture shows. Form box leaving lid free to open and close.

5. Cut a piece of white cardstock 6 3/4 x 1 3/4 inches. Using the Versa Fine ink stamp the sentiment on the right side of the paper.

6. Using the colors of the Memento inks, stamp images as shown cleaning stamp between different colors.
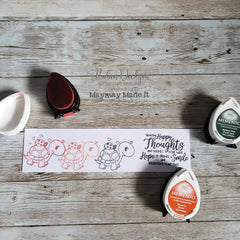
7. Take a scrap piece of the Party Time sheet cut 7" x 2" to layer underneath the stamped images. Adhere leaving a slight border equally around the edges.

8. Use the EK Tool Hydrangea punch to create decorative elements for the top of your box. Punch flowers several times and layer and glue the largest 3 flowers together to give a dimensional look, and add a tiny piece of dimensional foam tape to the back of the flower to give a little height. If you like, tie box with a piece of ribbon or twine. I used some Doodlebug design jewels to give a little shine and something extra.

That's all to it! We would love to see your take on this easy project, post your photos on Maymay's Customer Gallery!