
Tools you’ll need:
Paper trimmer--https://bit.ly/2RhIv2V
Cutting guide:
How to:
1.Beginning with your 8 ½ x 6 ½ piece, you’ll score on the 6 ½ side at 2 and 4 ½, rotate it and score at 2 and 6 ½. Your 9 ¾ cardstock on the short side, you’ll score at 2, rotate and score at ½ , 2 ½ , 5 ⅛ , and 7 ⅛ . Your final scoring piece which will be the 2 ⅝ x 5, on the 5 inch side you’ll score at ½ and 2 ¾.

2. Fold and smooth out all of your score lines on your cardstock.

3. On your 8 ½ x 6 ½ piece, cut up to the score line on all four of the squares to create flaps. -On the 9 ¾ piece, on the half inch score line, that tiny rectangle will be completely removed so then you have a free half inch flap. For the remaining boxes/squares, you’ll cut on the score lines up to the score line.

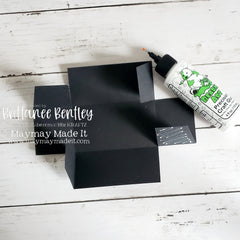
4. Now you’ll take your Bearly Arts Glue and add glue to the flaps of your box piece to adhere together and form the box.
5. As well, you’ll add glue to your flap on the 9 ¾ cardstock and line it up with the outside edge to form the sleeve.

6. Then fold over all the flaps and glue the last piece to adhere it to the rest to create a closed sleeve. You can insert the box inside the sleeve if you’d like.
7. Grab your easel base and add glue to the half inch portion and adhere it down to the top of the sleeve portion. Making sure the flap is folded downward pointing towards the opening of the sleeve.
8.Fold the easel mechanism, adhere glue to just the square and apply the top card piece, matching it from the very bottom to the corners.

9. Now the fun part, decorating! I cut my pieces to have an ⅛ border all around. You can cut yours according to your liking.

10. You can add a thumb notch to your drawer by using a 1 inch circle punch (or smaller) and putting it half way in the middle of your box. If you do so, make sure you mat your cardstock first and then punch.
There you have it! I do hope you enjoy making this project as much as I did (and still do). I also have a video tutorial that you can follow along with as well.https://youtu.be/l3YeQELnKHs Thanks so much and “see” you again soon!