
Cut Instruction:
~~From Graphic 45 Christmas Time Collection:
6 @ 5 ¾”x 5 ¾” - two additional smaller scrap pieces to cover the spine.
~~Black Cardstock:
Pockets: Large:
2 @ 7 ½”x 4 ½”
– Small 2 @ 7 ¾” x 4”
~~Hinges:
4 @ 1 ½”x 6”
(4 more of 1 ½”x 6” if you want to bind both sides)
~~Black Chipboard:
-3 @ 6”x 6”
- 1 @ 6” x 1/2”
– 1 @ 6”x1 ¼”
Instructions:
•Score your cardstock ‘hinges’ down the middle, and miter the ends so that they come to a point at the top and bottom (as shown). As you lay out your chipboard pieces, you want about 1/16” space in between the pieces before you glue down the hinges. This creates a space for the ‘pages’ to freely bend and not rub against each other

•As show in the first to photos, your chipboard is glued together first with on 6x6, followed by the 1 ¼ x6 piece and then another 6x6. If you want to stop here, you’ve just made yourself a little book with a front and back cover!
•Next you want to add the ½ x 6 piece and the last 6x6

If you are opting to put hinges on both sides, do the other side now. While the glue is still wet, you want to use your bone folder and kind of guide (mash) some of the paper into that 1/16” space between the chipboard. This ensures that you don’t glue your chipboard pieces into one long board that doesn’t bend
•Using your designer paper, cover the pages and the outside spines. You can also cover the inside spines at the this point if that is your style!


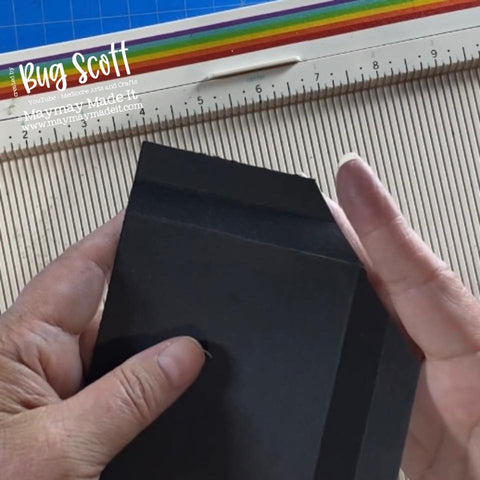
•For the large pockets use your scoreboard and score the short sides at ½” and 1” on both the short sides, and then across one of the long sides. The video might come in handy here. You can find time stamps in the video description to jump to the pockets if you like. Miter the two bottom corners as show – you can use your finger scissors like in the picture, but cutter bees or any actual scissors probably work better Fold in the little sections accordion style and glue down.

•The ‘smaller’ pockets are score the same way, but at ½”, 1” and 1 ½” on three sides. Check out the photo and you can see that I did an ‘extra’ score at 2” on the two sides – just up to the third score mark. These are your cut lines. Cut away the entire bottom sections as shown in the next photo- and fold in all your score lines accordion style. These pockets are a little trickier to glue down but if you hold down all your accordions, and glue the three sides down to the paper in that shape, you’ve got it!


•Find some of your favorite stickers and cut aparts and decorate your album cover and pockets. Fill your pockets with envelopes, handmade cards, tags and some postage!