
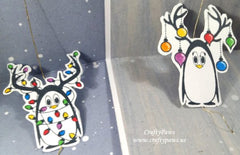
Ooooh I love interactive cards, and if there is a cute critter involved, BONUS! I had so much fun crafting these Christmas penguins spinner cards as my first guest designer project for Maymay Made It! The little penguins look like they are all set to party, especially as they spin around.
I used 4 of the penguins from the super cute Joy Clair Christmas Penguins stamp set, and made them into front and back images. For the penguins that were not symmetrical (like the ones with the ornaments or Christmas lights on the antlers), I first did some mirror stamping (there are mirroring stamp sets like the ct, but I used the smooth side of the very full wood grain stamp from the Lawn Fawn “Woodgrain Backdrops” set) using Momento Tuxedo Black Ink (the start-to-finish video below shows the details of how to do this). Then I crisped up the lines/details and filled in the faces with a Momento Tuxedo Black Dual Marker to make the back sides of the penguins.
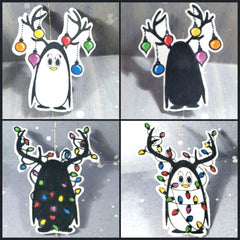
For the perfectly symmetrical penguins like the ones with the Christmas sweaters, I simply stamped them out twice and filled in the faces of one of each penguin with the Momento Tuxedo Black Dual Marker to make the back side images. A little simple Copic coloring (for a rainbow of ornaments and lights: R27, YR04, Y15, YG09, B06, V06 and pink and aqua sweaters: RV52, RV55, BG32) and fussy cutting and these front-and-back penguin images were ready to sandwich a little thread to become spinners!
For the card bases, I actually used two card bases for each card. The papers, which are all in dusty blue shades with white splatters that look like snowflakes, are from an old 2013 Recollections Christmas Watercolors paper stack. There is an outer card base that measures 4.25″ x 11″ and is scored at 5.5″. This card base card front is decorated with various Diemond Dies snowflake die cuts (Icy Snowflake Die Set, Snowflake #1, and Winter Snowflake Die Set) using blue metallic card stock and white card stock with Nuvo Glitter Drops in Midnight Sky for extra shine and textural interest.

For the sentiment on the card front, I used the Hero Arts Merry Stamp & Cuts on top of a Diemond Dies Labels 1 die cut base. I had just enough blue metallic card stock to cut a couple of label frames and a handful of the snowflakes for bright shiny pops of color. All the delicate die cuts were glued on with my favorite wet glue: Art Glitter Glue with a fine metal tip nozzle. The sentiment, which I stamped using a MISTI around the die cut “MERRY,” reads, “HAVE YOURSELF A MERRY LITTLE CHRISTMAS.”
There is also an inside liner card base that measures 4″ x 10.75″ and is scored at 5 3/8″. These are simply decorated with a single large white die cut snowflake (Icy Snowflake Die Set, Snowflake #1, and Winter Snowflake Die Set) in the lower left or right corner of the top-folding card.
To attach the spinner mechanism to this inside liner, I cut a small slit in the middle of the card (through both layers) with an X-Acto knife and threaded through the slits a thin thread; mine was DMC gold metallic thread, but you could use a fishing line or clear line for a more invisible magic look. When the thread could span the card open to about 90 degrees, then I secured the thread on the back side of the card liner with 5mm adhesive sticky tape. I then sandwiched the front and back of a penguin around the middle of that thread to make the spinner.
The last step was to position the inside card base inside the outside card base and adhering everything securing into place with more 5mm adhesive sticky tape. The inside liner card base is about 1/8″ smaller on all sides from the outside card base so there is a nice matted look to the card interior.
Supplies from Maymay Made It:
Joy Clair Christmas Penguins stamp set
Nuvo Glitter Drops in Midnight Sky
When shopping on cricut.com use the discount code MAYMAYMADE for 15% off and free shipping
** this discount does not apply to certain machines **
Remember to head on over to our Facebook group Maymay Made It and So Did I and join and share your projects.